

Wordで表の幅が調整できない・・・
こんな風にWordで「表の幅が調整できない」と悩んでいる人もいるのではないでしょうか?
この問題は幅の自動調整機能にある幅の固定や文字列に合わせる設定等で解決できます。
対処法は主に5つありますが、どれも1分あれば簡単に設定できますよ!
Wordで表の幅が調整できない時の
・基本・Windows版・Mac版の対処法(画像付き)
・ケースと原因
・Wordでの表の幅の調整に関するよくある質問
Wordで表の幅を調整できない時の基本の対処法

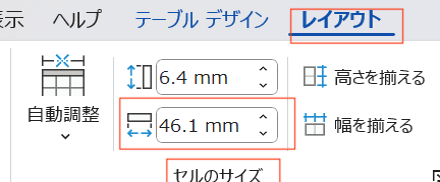
Wordで表の幅を調整できない時の基本のやり方は「数字で表の列幅を設定」することです。
手順は2つ。
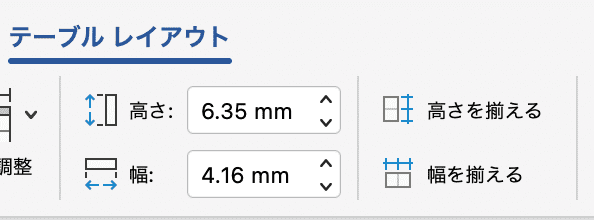
- 表を選択すると表示されるテーブル用の「レイアウトタブ」の「セルのサイズ」から「幅」を数字で設定する
又は
- 「右クリック」で「表のプロパティ」を開き、「
列タブ」の中にある「幅を指定する」にチェックをいれて数字を設定

これが基本の対処法になりますよ!
Wordで表の幅を調整できないケースと原因

Wordで表の幅が調整できないケースは次の4つ。
・Wordで表の幅を変更できない
・Wordで表の幅が狭くならない
・Wordの幅が勝手に広がる
・Word表の幅がドラッグで調整できない・罫線が動かない
これらを見ると原因は列幅の固定や文字列に合わせる設定やシート保護等です。
基本の対処法でできない時は次の対処法を試すといいですよ!
Wordで表の幅を調整できない時の対処法4選

Wordで表の幅を調整できない時の対処法は4つ。
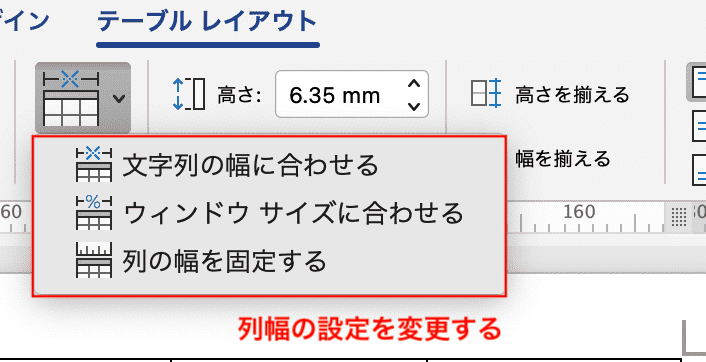
①列幅の固定の設定・解除
②文字列の幅に自動調整を設定・解除
③ウィンドウ幅に自動調整を設定・解除
④シートの保護の解除

設定はどれも簡単!1分もあれば設定できるよ!
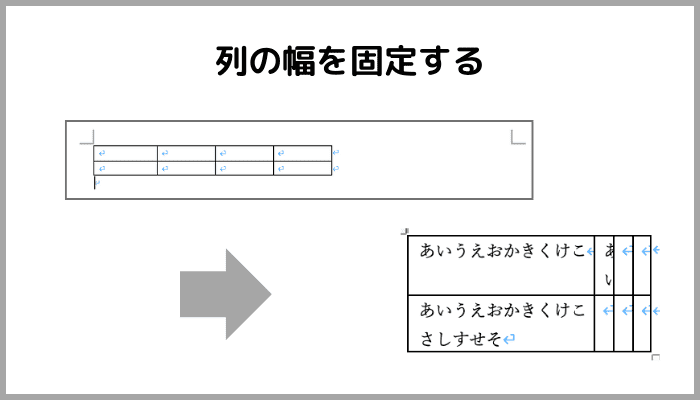
対処法①:列幅の固定の設定・解除
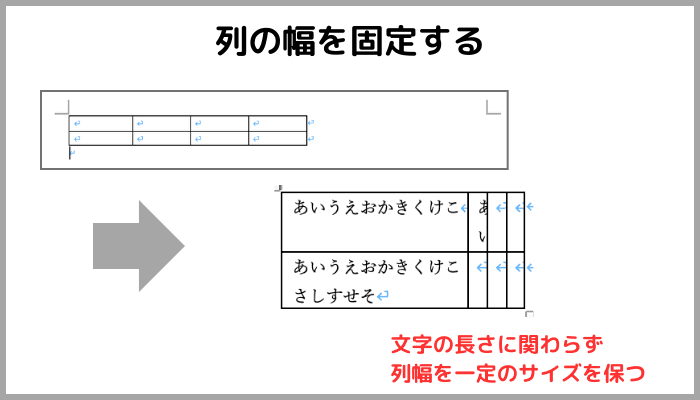
表の幅が変更できない時や狭くならない時に試してみてね
よくあるトラブルの解決で使われるからまず最初に確かめてみてね!
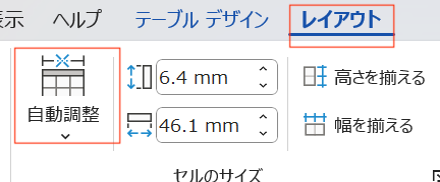
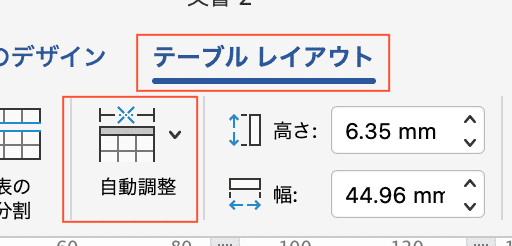
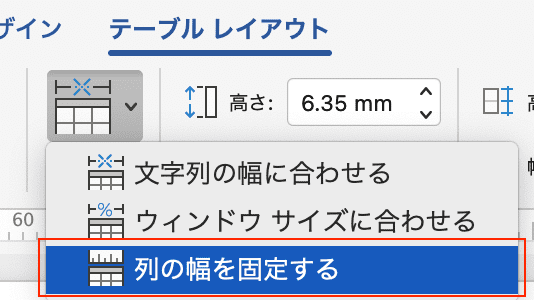
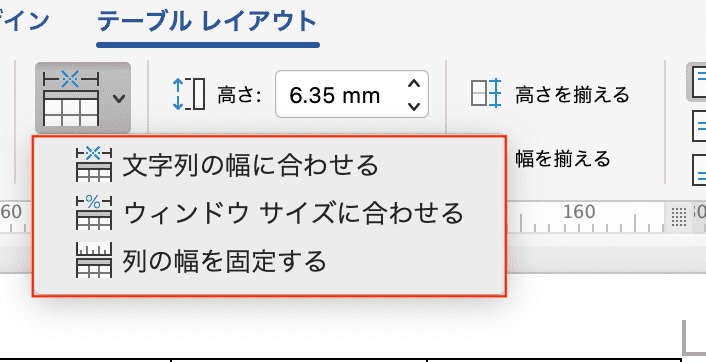
- 表を選択すると表示される「レイアウトタブ」の「セルのサイズ」の「自動調整」をクリック
- 「列の幅を固定する」をクリックして完了
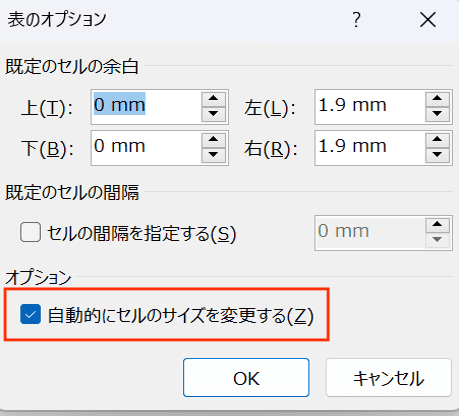
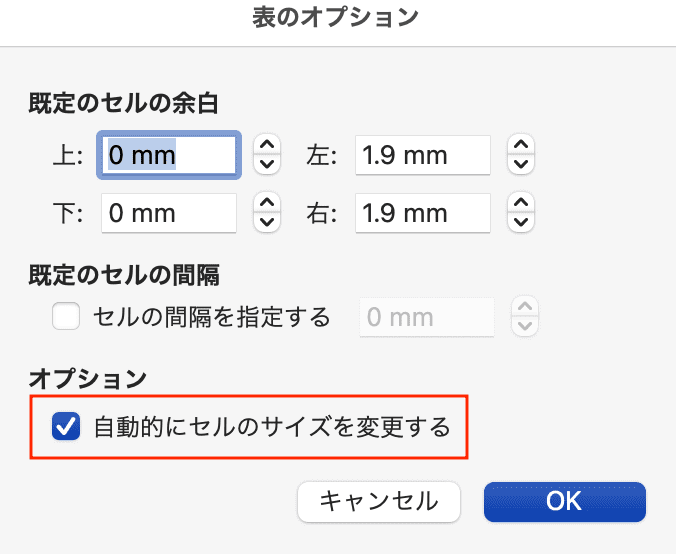
- 「表プロパティボックス」の「表タブ」にある「オプション」から「自動的にセルのサイズを変更する」にチェックが外れていれば設定は完了
- 列幅の固定を解除するには③の「自動的にセルのサイズを変更するにチェック」を入れる


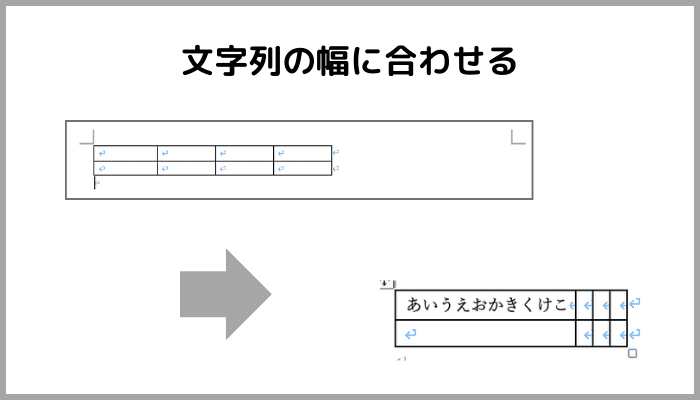
対処法②:文字列の幅に自動調整を設定・解除
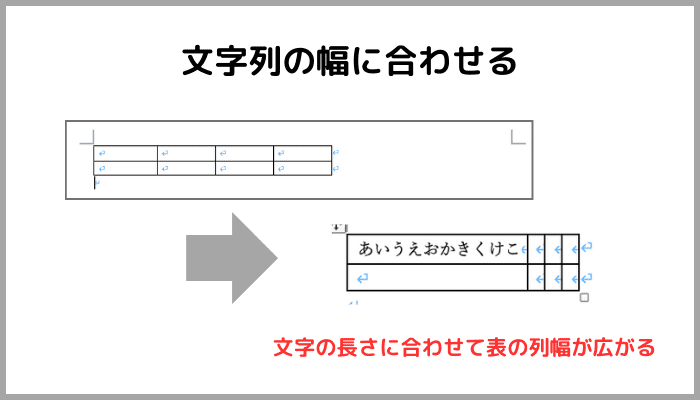
この対処法も表の幅は変更できない時や狭くならない時に使えるよ!
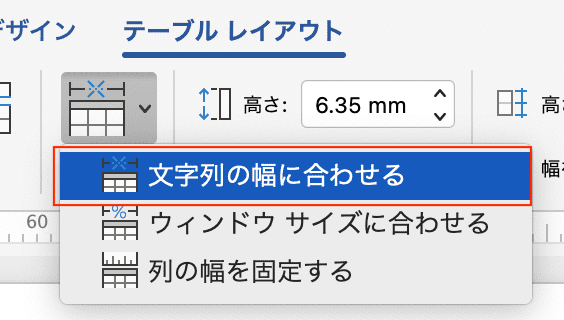
- 表を選択すると表示される「テーブルレイアウトタブ」の「セルのサイズ」の「自動調整」をクリック
- 「文字列の幅に自動調整」をクリックして完了
- 解除する時は「その他のメニュー」をクリックする
(例:「列の幅を固定する」をクリックして別の設定に変える)

(例:「列の幅を固定する」をクリックして別の設定に変える)

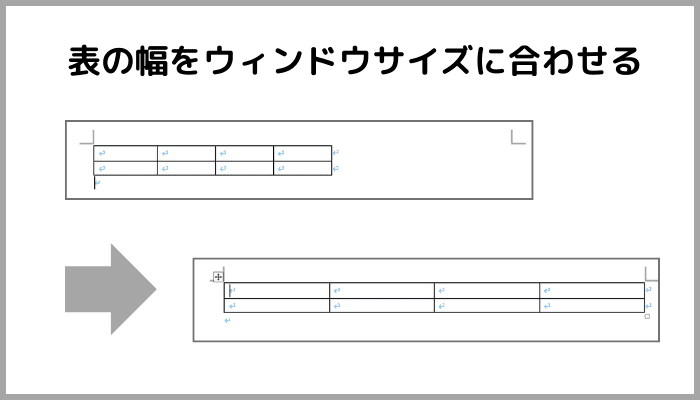
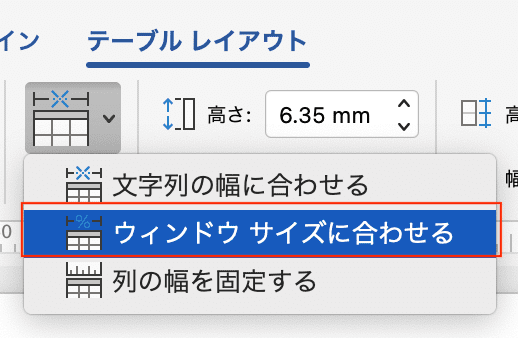
対処法③:ウィンドウ幅に自動調整を設定・解除
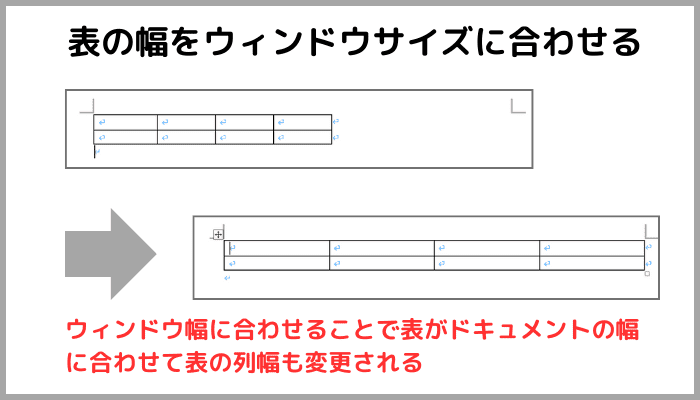
これは表の幅の調整方法の1つとして紹介するね!
Wordの編集エリアの幅に合わせて表のセル幅を合わせる時に使うと便利だよ!
- 表を選択すると表示される「レイアウトタブ」の「セルのサイズ」の「自動調整」をクリック
- 「ウィンドウ幅に自動調整」をクリックして完了
- 解除する時はその他のメニューをクリックすることで「ウィンドウ幅に自動調整」が解除される
例:「列の幅を固定する」をクリックして別の設定に変える

例:「列の幅を固定する」をクリックして別の設定に変える

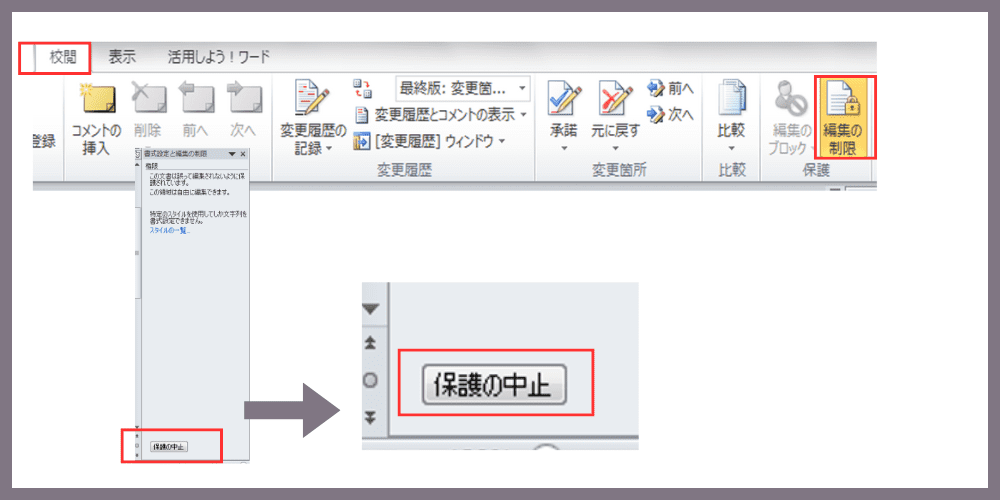
対処法④:シートの保護の解除
表の幅をドラッグで調整できない時や罫線が動かない時に試してね
- 「校閲タブ」の「保護」から「編集の制限」をクリックして「保護の中止」をクリックして解除
Wordで表の幅を調整できない時の対処法【Mac編】

Mac版のWordで表の幅を調整できない時の対処法は4つ。
①数字で表の列幅を設定
②列幅の固定の設定・解除
③文字列の幅に自動調整を設定・解除
④ウィンドウ幅に自動調整を設定・解除
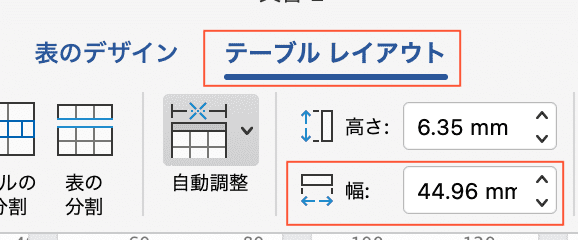
対処法①:数字で表の列幅を設定
Windows版とほぼ同じだよ!メニューの位置を確認しよう
手順は2つ。
- 「テーブルレイアウトタブ」の「幅」を数字で設定する
又は
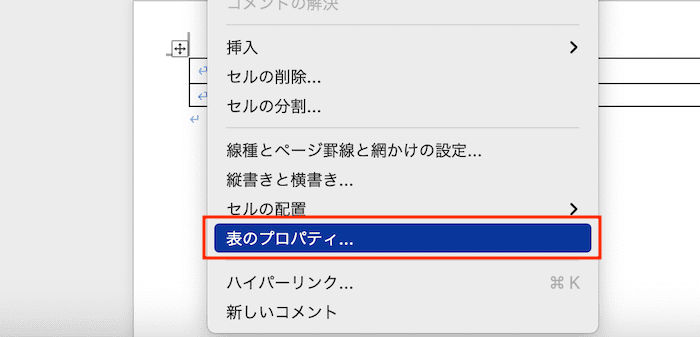
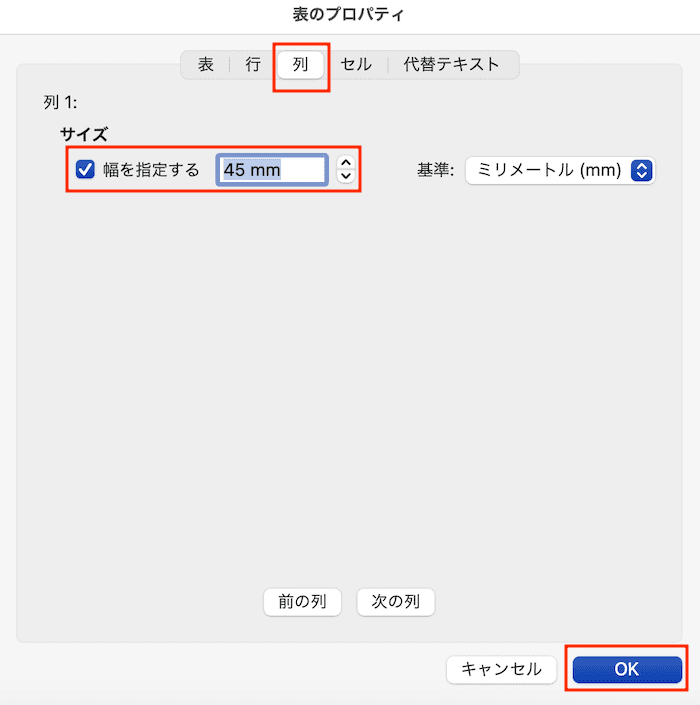
- 「右クリック」で「表のプロパティ」を開き、「
列タブ」の中にある「幅を指定する」にチェックをいれて数字を設定
又は
対処法②:列幅の固定の設定・解除
列幅の固定はWindowsと設定と変わらないよ!
- 「テーブルレイアウトタブ」の「自動調整」をクリック
- 「列の幅を固定する」をクリックして完了
- 「表プロパティボックス」の「表タブ」にある「オプション」から「自動的にセルのサイズを変更する」にチェックが外れていれば設定は完了
- 列幅の固定を解除するには③の「自動的にセルのサイズを変更するにチェック」を入れる

対処法③:文字列の幅に自動調整を設定・解除
この対処法も表の幅は変更できない時や狭くならない時に使えるよ!
- 「テーブルレイアウトタブ」の「自動調整」をクリック
- 「文字列の幅に自動調整」をクリックして完了
- 解除する時は「その他のメニュー」をクリックする
(例:「文字幅の幅に自動調整」→「幅を固定にする」、表のプロパティから列幅を固定させるなど)
(例:「文字幅の幅に自動調整」→「幅を固定にする」、表のプロパティから列幅を固定させるなど)
対処法④:ウィンドウサイズに自動調整を設定・解除
これは表の幅の調整方法の1つとして紹介するね!
Wordの編集エリアの幅に合わせて表のセル幅を合わせる時に使うと便利だよ!
- 「テーブルレイアウトタブ」の「自動調整」をクリック
- 「ウィンドウサイズに自動調整」をクリックして完了
- 解除する時はその他のメニューをクリックすることで「ウィンドウ幅に自動調整」が解除される
例:「列の幅を固定する」をクリックして別の設定に変える
(例:「列の幅を固定する」をクリックして別の設定に変える等する。)
Wordで表の幅の調整に関するよくある質問〜Q&A〜

Wordの表で全ての列幅を同じサイズに揃えたい
「幅を揃える」コマンドで全ての列幅を同じサイズにできる
Word表で一括で列幅を変更するには?
表全体を選択してから列幅の設定をすると一括で全て同じ幅に揃えて変更できる!


